3 hours Kimono Wrap Top

Source: http://3hourspast.com/2012/02/11/kimono-wrap-top-pattern-is-live-and-merino-fabric-giveaway/ 

Time to make: 3 hours from cutting out to taking these photos

As Stephc says: “It’s a heavily adapted version of Advance 7701 from the 50′s.” The pattern actually has two versions – the wrap we’ve all seen Steph’s photos of and also a draped front cardigan version without the ties.

Pros:

Oh so quick to put together! I would say about 40 minutes of the three hours was overlocking and then hemming the neck/front opening/ hem edge. What can I say, an unfinished edge looks unfinished to me. I also stopped for a cup of tea.

I wore this out last night to a show and the high neck and wrap around gave a lovely snuggly feel while also feeling ‘dressed’. I added the optional sleevebands for the same reason – I made a pattern piece for these as I tend to forget to cut them out otherwise.

The centre back seam also got the optional fusible stay tape. The seam in the back visually works really well. Made in bold stripes you’d get a fab chevron effect.

I played around later last night with the tie and decided I also like it tied in the back – I get a nice soft bow and this makes the whole top softer looking. A good move from more to less formal. My husband commented that the fabric choice will also make it move from casual to work wear. I can see a nice slightly shiny grey knit in my future…

Cons:

I did have a bit of trouble with lining up the pattern pieces, some had to be skewed at the edges to make the straight lines straight and the curved lines logically curved. Steph responded superquick to an email I sent in the middle of stickytaping the pattern together and things sped up from there.

Update: Steph has updated the Craftsy pattern since I bought my copy which eliminates the issues I had.

Because I *did* finish the edge of the wrappy tie part, there is less stretch there than in some other people’s makes – but it still gives me enough space to tie around my waist. Next time I might experiment with the rolled hem foot on my overlocker.

Fabric: Spotlight 62%Poly/33%rayon/5%Spandex knit with excellent recovery  and I got it out of 1.5m ($20) of 150cm wide knit. I don’t have many knits in my fabric cupboard other than merino so had a special treat of Spotlight on a Saturday lunchtime.

Notions: Strangely I had the right colour thread already. Strange because it’s not a colour I wear but it was leftovers from my kidswear market stall business 19 years ago.

Pattern: http://www.craftsy.com/pattern/sewing/Clothing/Kimono-Wrap-Top–Draped-Cardigan/4803 made to ‘bracelet length’ which turned out a short 3/4 sleeve on me.

Overall – Definitely make again in some other fabrics. A good wardrobe building pattern that could look good in a range of fabrics. Also with the flexibility in sizing it would make an excellent gift project.

Update: I wore this all day Sunday to do a few batches of preserving and jam making and the comfort-factor was perfect.

Finished Object: Minoru Jacket

We did contemplate using the garden hose to create ‘rain’…


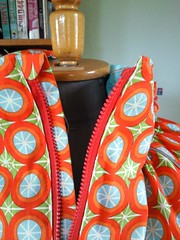
I’m really delighted with how this jacket has turned out. It is as useful and as crazy as I was hoping. The photo showing the reflective piping is the most accurate in colour. Dare I say some of the others look a little washed out? The Minoru pattern is beautifully designed, and I think it is one of the first raglan sleeve garments I have made and liked. I did make a couple of tweaks:

  • I changed where the hood was attached, and followed the suggestion to line it. I also added an elastic drawstring.
  • I added an underlay to the zipper opening.
  • I added reflective piping to the raglan seams. After I’d sewn the sleeve seams I discovered this fabric needed a bit more room for comfortable arm movement so I slashed up the sleeves vertically and inserted an extra 7cm (guided by the fabric). I made it into a ‘design feature’ by running reflective piping in the seam.
  • I added welt + flap pockets to the front. I lengthened one internal pocket to fit my rectangular wallet.
  • And I skipped the elastic cuffs as I wanted a more jackety look. I did have thoughts about buttons and tabs for cinching them in, but decided they were great as a simple turned up hem.

The Fabric

Loud, I think is a good description of the colour and pattern. The first but definitely not the last time I’ve sewn a waterproof fabric for a garment. iPad covers with the coating on the outside are a lot easier! I used seam sealing tape (thanks to Caroline’s guest post on rainwear at Sewaholic.net), learnt about teflon feet and masking tape.

Thanks to Tasia for hosting the Minoru sewalong – it gave me the impetus to get started and make use of my birthday present pattern. Through this pattern and sewalong I am feeling braver about adding my own ideas to a solid base pattern, and also having a great deal of fun documenting the journey. I love the creativity that goes into a project like this. I was inspired by seeing everyone’s finished Minorus when the pattern was first revealed and I am keenly anticipating many more Minorus popping up all over the interwebs soon. I did finish early as the end was in sight and I needed the sewing to keep me sane.

Fabric: Waterproof Riley Blake design cotton, coated ‘PUL’. Source http://nappiescovered.com.au/ Prompt service, realistic colours in their photos and useful information online including how to use seam sealing tape.

Cost: $90 for fabric, $12 for seam sealing tape (+postage), $10 lining fabric, $3 thread, $7 for zips (+airfares as bought on interstate leisure trip), $5 reflective tape (+ airfares as bought extra length interstate on a work trip!).  $15? teflon foot, Pattern – birthday present from my dear husband – priceless :-)

So not cheap, but truely one of a kind. Early in December I saw some unlined waterproof trench coats imported from The Netherlands for about $180, so it is comparable. I don’t think I really should count two lots of interstate airfares, although it does highlight that the only thing bought locally for this jacket was the thread and lining. Everything pretty much was mail order or bought while interstate. Are you hearing me Spotlight?

Hours: not sure…

Pattern: Sewaholic Minoru

Make again? Most likely in a cotton unbrushed fleecy without a hood as a snuggly comfy jacket.


Okay, next project – something from leftover fabric and quick to sew


Minoru: Nearly done

Over the weekend I made and inserted the lining and completed the zipper packets. Tuesday night I topstitched around the collar and down the front. I also pinned up the hem ready for pressing before sewing it in place.

I’m now nearly done. This morning before work I topstitched the hem into place.

This morning I woke up before even the cats thought it was a reasonable time to be awake. I call it ‘stupid o’clock’.

I caught up with my regular reading including sewing blogs and was tickled pink to see Tasia had highlighted my welt pocket addition to the Minoru [insert excited squeal here] I’ve been very proud of those pockets, now even more so. Although I would strongly recommend inserting them on the front pieces before you sew anything else. I did it after doing sleeve and side seams which meant a bit of faffing about getting the rest of the jacket out of the way while sewing. All credit to Sherry’s wonderful welt pocket tutorial at pattern-scissors-cloth.

Another tweak I have done is add an underlay to the zipper in deference to my plans to potentially wear this while bike riding; if the rain is hitting my front, the non-waterproof zipper is a weak point. Finding a waterproof zipper or waterproofing one was off the cards. Adding the placket underlay would probably be overkill for a regular fabric jacket though.

Zip underlay

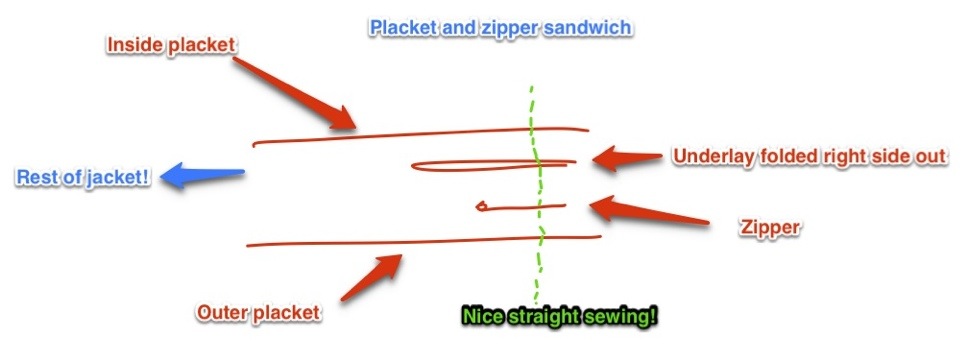
I cut a fifth placket out of the main fabric, folded it in half and made a little rounded end to it for folding over the top of the zip. Blatantly copied from my son’s rain jackets again. It will also stop the zipper getting caught in clothing underneath which is something that seems to happen quite a bit to me. I’ve discovered it also makes a nice little tab of fabric to hold onto while pulling up the zipper to start with. To attach it, I sandwiched the zipper between the underlay and packets, having finished both ends of the underlay already. It should be roughly an inch longer than the placket to allow for the turnover.

My first attempt at a useful sewing diagram

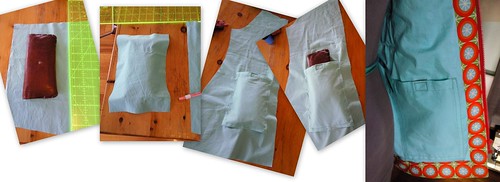
I also made one of the internal pockets longer so my wallet would fit in there. The key step here is putting your wallet on the fabric and drawing around it.

Internal Wallet Pocket

click for larger original


What’s left? The sleeves adaption I have planned.

This has been one of the beauties of Tasia’s pattern – it allows you to really make it your own if you want to. I’m thinking I’ll need one in a simple fleece for early morning gym trips… That’ll be a nice simple one.

Best Foot Forward

One of the best sewing things I’ve done recently was buy a few more specific feet for my sewing machine.

Teflon Foot from gonesewing.com

To get through the Minoru Jacket sewalong using my coated fabric without going insane, the Teflon foot is making a world of difference. When reading some information a while ago about using coated/ waterproof fabrics I’d come across the teflon feet. Sounded interesting but I didn’t order at the time. I did order the foot once I had selected my fabric – but had to wait until the second Monday of the sewalong for it to arrive.

Before the magic foot…
After a quick sample sew of my coated fabric without any special non-stick feet I wondered if I’d bitten off more than I could chew. The fabric bunched up under the foot and made a godawful mess. Deep breath and walk away for a few days. Tried not to sulk. I cut out the lining fabric instead as a diversion. I also made my own reflective piping out of some tape.

Then I remembered reading something about putting masking tape on the underside of the normal foot and gave that a shot – much better but still not perfect. I had to guide the fabric in and out at the back to stop occasional puckering and misbehavior. But it was good enough to get started and sew the shoulder seams including with their reflective piping. Too many four letter words though still. And it seemed to take about 4 times as long as it should have. I am glad the seams will be hidden by lining as some had to be restitched in places where I have wonky lines. Looks great on the outside :-)

When my teflon foot arrived and I tried it – bliss! pretty much like sewing regular fabric with a bit more attention to starting off. Phew. Since then sewing my jacket got a lot easier.


I also picked up a stitch in the ditch or edgestitching foot. Combined with putting the needle into the far left position, it makes topstitching accurately so easy.

Stitch in the ditch foot from gonesewing.com