Melanie of Poppykettle’s post about having her ‘colours done’ reminded me I’d never posted about one of my DIY hacks. Back in the 80′s, yes, our house had a copy of Colour Me Beautiful and Mum, my sister and I all figured out what we were. I remember being a bit narked I came out as a ‘Spring’ as the pastels weren’t really what I felt like wearing as a teenager – too pretty and girly. Over the years I’ve worn a lot of white shirts, blue, ever so much blue and grey, red and probably too much black. Lately I’ve become conscious of injecting more colour into my wardrobe, adding orange and greens. Several years back I even had a New Year’s Resolution to “wear more pink” which I successfully achieved with a pale pink linen shirt that I wore until it was past threadbare and just dissolved. Far more successful than the year it was “wear more bracelets”. I just have my favourite jewellery, Ok?
Me-Made-May was a bit of a wakeup call though. There’s a lot of grey I wear, and so one change brought about by taking a photo everyday was that I started deliberately wearing scarves for colour and tried to mix it up a bit.
Back in November last year I was envious of Mum’s colour swatches she carries about with her. So having an idea of colours I think suit me, I set about making my own. I’m not very good at taking advice of others when I think I can muddle through. Hearing Melanie’s description of discovering new colours has piqued my interest however …
Here’s how I approached it.
Stage 1: Sourcing Supplies
- Go to your local hardware store. Not your paint store – they might actually offer to help you.
- Gather lots of colour chips. You want the ones on card, not the booklets on flimsy paper with tiny swatches.
- Look through your collection surreptitiously and realise you have too many of ‘x’ colour (for me it was blue, duh!).
- Force yourself to choose some colours that go well with blue – close colours, logical combos, wildy contrasting and everything inbetween. Choose a couple of ‘trendy’ colours to see if they work for you in Stage 2.
- Be sure to grab a handful of whites, offwhites and creams. Do the same for greys/browns or your preferred neutral.
- Saunter off towards the power tool section, then make a break for the exit.
Stage 2 – Go home and play with your colours
- Grab beverage of choice, and work during daylight hours if at all possible.
- You can cut the chips up now to make it easier to arrange things. And open a bag of chips to go with the drink if needed.
- Arrange them into outfit groups, or groups you think would look nice together in a print. Also group them into variations on a theme.

- Check them against your favourite clothes that you know flatter you. Grab that favourite white/off-white/cream top and find your closest match. Mark that one with a big star on the back so you don’t mix it up later. Ask me how I know.
- Put all the ‘what was I thinking’ colours off to the side. It’s strange how obvious they are all laid out together.
- Surf the internet looking for colour combinations for inspirations. Remember what you were meant to be doing. Come back and make a few more ‘outfit’ combo groups.
- Grab some of those colours back out of the reject pile to aid step 6.
- When you’re happy …
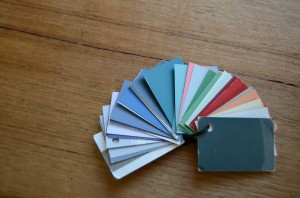
Stage 3: Make your Colour wheel
- Decide on a size for your swatches. Bigger is better, but you’ll be restricted somewhat by the size of your smallest swatch. Cut all your chosen chips to a consistent size. A ruler and stanley knife helps here.
- Punch a hole in the same corner of all pieces. Keep the coloured dots. You’ll see why.
- Organise your pieces in some sort of order.
- Tie a piece of ribbon through the hole or find a metal ring that will fit.
Ta da! Remember you can always duck into the hardware store the following weekend when you realise you need a nice brick red or turquoise to add to the mix.
Bonus points if you have access to a laminator. Grab all those dots. Tuck them inside a laminating pouch and zap them. Trim to credit card size and tuck in your wallet. If you put it over a fabric and it kind of melds in and looks happy you should buy the fabric. It’s the rule. And you’ll never be without your colours. Unless you give it to your mother before she goes to Japan – but that’s another blog post.


